So you have the discovery kit and you have run the example image on the SD card. But how do you build an OpenSTLinux image from scratch with Yocto, using a device tree file file generated by STM32CubeIDE? We will go through the build chain setup, the device tree configuration and the build process. There is also a section at the end for troubleshooting build errors.
This guide is aimed at users who are both new to Yocto and also OpenSTLinux. It only covers the most basic distribution. i.e. no X11/Weyland, no QT, etc… It doesn’t cover custom hardware. It will take you to the command prompt of the STM32MP157F-DK2….and thats it.
Yocto is a complex beast. STMicro conventiently provide an “addons” layer to their distribution package, so we can skip the step of adding a custom layer in Yocto.
STMicro divide their device tree files into four sections:
- Trusted Firmware-A – This provides HW definitiosn for the First Stage Bootloader (FSBL) or BL2/BL32
- U-Boot – This provides HW definitions for the Second Stage Bootloader (SSBL) or BL33
- Kernel – This provides HW definitions for the Linux kernel.
- OP-TEE OS – This provides HW definitions for the runtime security OS layer. This is usually a direct copy of the TF-A device tree files.
So lets get started….
Page Contents
A. Setup and configuration steps
Install Yocto system requirements
We will be using the Yocto project and its build system so we need to install the linux tools. Instructions are found here.
Install Git-Repo
Check you have the repo tool installed by running it in the terminal. If it is not installed and you have issues using apt to install the repo tool, you can install it manually using these instructions.
If you then try to run repo and get errors such as
/usr/bin/env: 'python' No such file or directory
- Have you installed python3?
sudo apt install python3
- If so, where is python installed?
whereis python3
- Add a symlink to /usr/bin
sudo ln -s /usr/bin/python3 /usr/bin/python
You should now be able to run the repo command in the terminal without error.
Install OpenSTLinux
Create the Yocto project directory:
mkdir -p ~/workspace/mp15_ecosys_2.1.0/distpkg/openstlinux-5.10-dunfell-mp1-21-03-31
Change to the directory:
cd ~/workspace/mp15_ecosys_2.1.0/distpkg/openstlinux-5.10-dunfell-mp1-21-03-31
Initialise the OpenSTLinux distribution repo:
repo init -u https://github.com/STMicroelectronics/oe-manifest.git -b refs/tags/openstlinux-5.10-dunfell-mp1-21-03-31
Clone the OpenSTLinux distribution repo:
repo sync
Create the STM32CubeMx project.
- Create a new workspace and use the wizard to create a new STM32 project.
-
Search for your DK2 board e.g. STM32MP157F-DK2
-
When prompted select YES to initialise all peripherals to their default mode. The IDE may download missing SW packages if required.
-
When prompted select YES to setup OpenSTLinux-5.10-dunfell-mp1-21-03-31. Note this version must match the distribution cloned in the previous steps. Otherwise build problems will occur later on. Each release of the STM32CubeIDE is fixed to a specific release of OpenSTLinux. So you can either use different version of the STM32CubeIDE to match your cloned OpenSTLinux repo or clone a different OpenSTLinux repo to match your IDE.
-
You will be asked to check system requirements. Read the document, install the software before continuing!
-
Finally, download the OpenSTLinux package. See this wiki page for more details. Note if you pick the embedded inistall location then the OpenSTLinux SDK will installed to the user home directory. e.g. /home/USER/.eclipse
You should now have a project with both CA7 and CM4 sub projects. Expand the CA7 project and the DeviceTree directories. There should be a linux kernel, tf-a and u-boot directory. However, there is one missing directory.
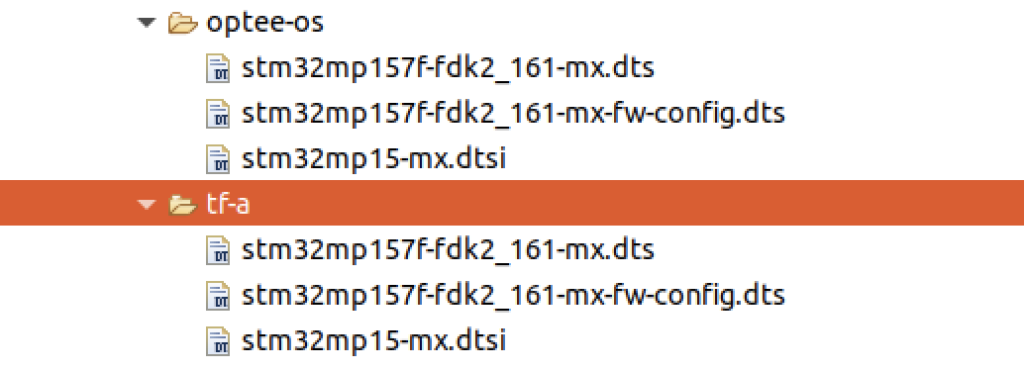
The optee-os device tree files are not auto-generated but are identical to the generated tf-a files, so we can reuse the tf-a device tree files. Copy the folder named tf-a along with its contents and rename it to optee-os. You should end up with this:

Note that the duplicated optee-os dts file does not need the #include "stm32mp15-ddr.dtsi", so comment it out:

Configure the Yocto custom layer
Add a symbolic link to your distribution package to target this STM32CubeMx project.
- Create the
mxdirectory in thelayers/meta-st/meta-st-stm32mp-addonsdirectory. -
Inside the
mxdirectory, create a symbolic link targeting the STM32CubeMX project. For example:
ln -s /home/chris/workspace/stm32157fdk2_test stm32mp157f_dk2
Modify the machine configuration file
Modify your machine configuration file distpkg/openstlinux-5.10-dunfell-mp1-21-03-31/layers/meta-st/meta-st-stm32mp-addons/conf/machine/stm32mp1-mx.conf file so that the MACHINE defined in the meta-st-stm32mp-addons layer will use your STM32CubeMX project device tree source files. The two important lines are at the bottom of the file:

| Variable | Description |
|---|---|
| CUBEMX_DTB | The prefix of your dts files, e.g. stm32mp157f-fdk2_161-mx |
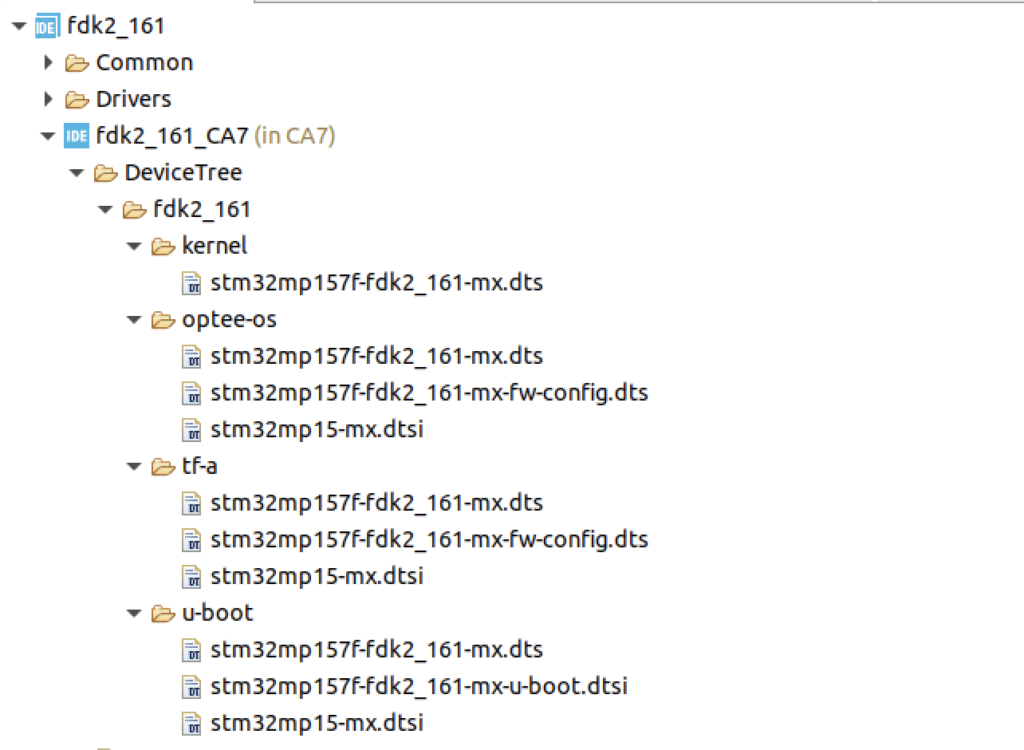
| CUBEMX_PROJECT | The internal STM32CubeIDE project path to the dts files, e.g. mx/fdk2_161/CA7/DeviceTree/fdk2_161 |
The second variable is comprised of the mx directory, the name of the symbolic link created in the previous step – fdk2_161 – and then the path of the device tree files in the STM32CubeIDE project. You can use your STM32CubeIDE project to determine these variables:

If you get this path wrong, don’t worry. The bitbake build will give an error message and it will be fairly obvious that this is the cause. More on that in the last section.
Building the image
Now we are ready to build the image using the yocto build engine.
Setup the build environment
Make sure you are in the root directory of the OpenSTLinux distribution package:
cd ~/workspace/mp15_ecosys_2.1.0/distpkg/openstlinux-5.10-dunfell-mp1-21-03-31
Initialise the build environment:
source ./layers/meta-st/scripts/envsetup.sh
This will load a user interface that lets you select the distribution and machine to build.
Select the DISTRO as openstlinux-eglfs and MACHINE as stm32mp1-mx
Accept the ST EULA.
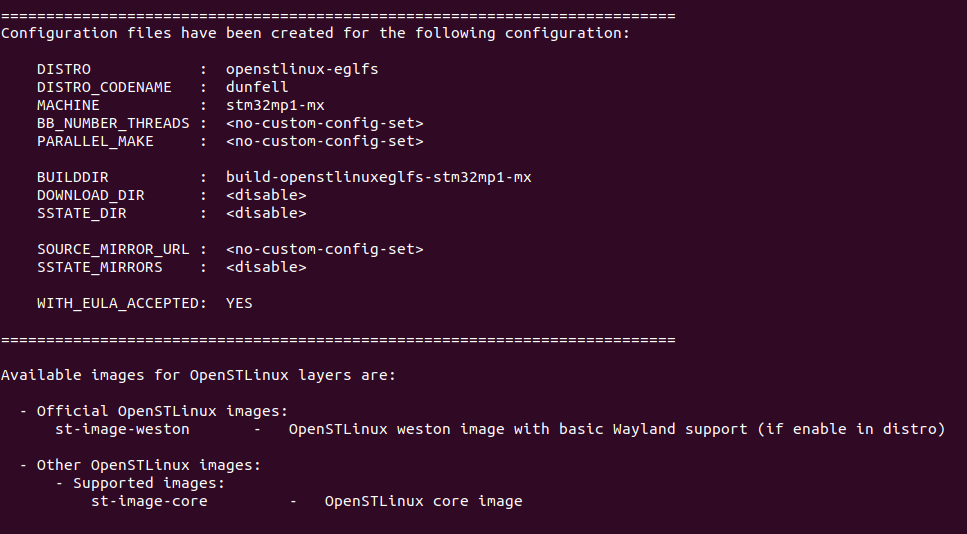
You should now see the output:

Since we are piggy-backing on the existing meta-st-stm32-addons layer, we don’t need to add our own layer.
You can confirm that the local distribution package is included in the build by running:
bitbake-layers show-layers

You can see the addons layer is matching with the location of our OpenSTLinux distribution download.
Compile the yocto project
Type the following command to start the build:
bitbake st-image-core
Bitbake error messages can be scary-looking, but never fear! Check below for guidance.
Fixing Bitbake errors.
Errors messages contain a lot of irrelevant information but they also contain all the information that you need to fix the problem. For example, they should refer to a path or file that will highlight the problem or at least provide a hint.
For example, this file is caused by missing optee-os dts files.
ERROR: optee-os-stm32mp-3.12.0.r1-r0 do_compile: File /home/chris/workspace/mp15_ecosys_2.1.0/distpkg/openstlinux-5.10-dunfell-mp1-21-03-31/layers/meta-st/meta-st-stm32mp-addons/mx/fdk2_161/CA7/DeviceTree/fdk2_161/optee-os/stm32mp157f-fdk2_161-mx.dts not found: compilation aborted for optee-os-stm32mp device tree.
You may also get errors like the one shown below.
ERROR: /home/chris/workspace/mp15_ecosys_2.1.0/distpkg/openstlinux-5.10-dunfell-mp1-21-03-31/layers/meta-st/meta-st-stm32mp/recipes-kernel/linux/linux-stm32mp_5.10.bb:   0:01:28
[cubemx-stm32mp] Not able to find "mx/stm32mp157f_dk2/CA7/DeviceTree/stm32157f_dk2_161" path from current BBPATH var:
    /home/chris/workspace/mp15_ecosys_2.1.0/distpkg/openstlinux-5.10-dunfell-mp1-21-03-31/build-openstlinuxeglfs-stm32mp1-mx
    /home/chris/workspace/mp15_ecosys_2.1.0/distpkg/openstlinux-5.10-dunfell-mp1-21-03-31/layers/meta-st/meta-st-stm32mp-addons
    /home/chris/workspace/mp15_ecosys_2.1.0/distpkg/openstlinux-5.10-dunfell-mp1-21-03-31/layers/meta-openembedded/meta-python
    /home/chris/workspace/mp15_ecosys_2.1.0/distpkg/openstlinux-5.10-dunfell-mp1-21-03-31/layers/meta-openembedded/meta-oe
    /home/chris/workspace/mp15_ecosys_2.1.0/distpkg/openstlinux-5.10-dunfell-mp1-21-03-31/layers/meta-openembedded/meta-gnome
    /home/chris/workspace/mp15_ecosys_2.1.0/distpkg/openstlinux-5.10-dunfell-mp1-21-03-31/layers/meta-openembedded/meta-initramfs
    /home/chris/workspace/mp15_ecosys_2.1.0/distpkg/openstlinux-5.10-dunfell-mp1-21-03-31/layers/meta-openembedded/meta-multimedia
    /home/chris/workspace/mp15_ecosys_2.1.0/distpkg/openstlinux-5.10-dunfell-mp1-21-03-31/layers/meta-openembedded/meta-networking
    /home/chris/workspace/mp15_ecosys_2.1.0/distpkg/openstlinux-5.10-dunfell-mp1-21-03-31/layers/meta-openembedded/meta-webserver
    /home/chris/workspace/mp15_ecosys_2.1.0/distpkg/openstlinux-5.10-dunfell-mp1-21-03-31/layers/meta-openembedded/meta-filesystems
    /home/chris/workspace/mp15_ecosys_2.1.0/distpkg/openstlinux-5.10-dunfell-mp1-21-03-31/layers/meta-openembedded/meta-perl
    /home/chris/workspace/mp15_ecosys_2.1.0/distpkg/openstlinux-5.10-dunfell-mp1-21-03-31/layers/meta-st/meta-st-stm32mp
    /home/chris/workspace/mp15_ecosys_2.1.0/distpkg/openstlinux-5.10-dunfell-mp1-21-03-31/layers/meta-qt5
    /home/chris/workspace/mp15_ecosys_2.1.0/distpkg/openstlinux-5.10-dunfell-mp1-21-03-31/layers/meta-st/meta-st-openstlinux
    /home/chris/workspace/mp15_ecosys_2.1.0/distpkg/openstlinux-5.10-dunfell-mp1-21-03-31/layers/openembedded-core/meta.
ERROR: Failed to parse recipe: /home/chris/workspace/mp15_ecosys_2.1.0/distpkg/openstlinux-5.10-dunfell-mp1-21-03-31/layers/meta-st/meta-st-stm32mp/recipes-kernel/linux/linux-stm32mp_5.10.bb
Note this is the same path added to themeta-st-stm32mp-addons/conf/machine/stm32mp1-mx.conffile. The path set in theCUBEMX_PROJECTvariable does not match the internal STM32CubeMX project structure. Similar errors will occur if theCUBEMX_DTBvariable does not match the dts files in the STM32CubeMX project.
Don’t forget to clean the recipe/package/component after fixing a related compiler error.
bitbake -c clean optee-os-stm32mp
bitbake -c clean tf-a-stm32mp
bitbake -c clean linux-stm32mp
bitbake -c clean u-boot-stm32mp
Likewise you can make the individual recipes by running
bitbake optee-os-stm32mp
bitbake tf-a-stm32mp
bitbake linux-stm32mp
bitbake u-boot-stm32mp
Booting Linux
The image can be booted using a microSD card.
See these instructions for preparing the bitbake output.
We want to use menuconfig but we need to first checkout a local copy of the OpenSTLinux source and map it to the provider: virtual/kernel.
1) init the build environment with DISTRO and MACHINE
source ./layers/meta-st/scripts/envsetup.sh
for example:
Select the DISTRO asopenstlinux-eglfsand MACHINE asstm32mp1-mx
2) Map virtual/kernel to linux-stm32mp
devtool modify virtual/kernel
3) Run menuconfig
bitbake virtual/kernel -c menuconfig
4) Modify the debug levels:
Symbol: CONSOLE_LOGLEVEL_DEFAULT [=7]
Location:
  -> Kernel hacking
    -> printk and dmesg options
      (7) Default console loglevel (1-15)

Symbol: MESSAGE_LOGLEVEL_DEFAULT [=4]
Location:
  -> Kernel hacking
    -> printk and dmesg options
      (4) Default message log level (1-7)
5) Rebuild the kernel
bitbake virtual/kernel
6) Copy uImage to sd card
sudo cp <build dir>/tmp-glibc/deploy/images/<machine name>/kernel/uImage /media/chris/sdcard/bootfs/
